
Get Tech Tips
Subscribe to get free tech tips.
Solving Superheat


In this article, we’ll discuss solving superheat using this diagnostic sheet to help us better understand how it is calculated and from where it is derived. I want to thank Ty Branaman for helping me develop these sheets that will hopefully aid in a better understanding of some of the basic HVAC measurements that both new and experienced techs use day in and day out.
What is Superheat?
To start with, let's make sure we have a general understanding of what superheat is. I am not going to go into great detail on the subject, as there are already some great articles at https://hvacrschool.com/.
Superheat, for the purposes of this article and as it pertains to HVAC, is the amount of heat gained by a refrigerant after it has completely changed state to vapor. Every degree of heat increase to the vapor is considered a degree of superheat. So, quite simply put, 10 degrees of heat above the saturated temperature (or the boiling point of the refrigerant) is considered 10 degrees of superheat.
It is important to note that this process could happen in either the indoor or outdoor coil, depending on the type of equipment. For example, a heat pump, depending on what mode it is in, could be boiling/evaporating refrigerant in either the outdoor coil for heating or the indoor coil for cooling. To better understand this process, I recommend that you watch 3D How Refrigeration and Air Conditioning Works P1 – Components to learn more about the refrigeration cycle.
There are three types of superheat measurements. The one discussed in this tech tip is the most common measurement; it’s known as system superheat and is taken at the outdoor unit on the suction line. System superheat includes any additional heat added to the vapor in the suction line. Longer suction lines will be affected. There is also the evaporator superheat, which is taken at the evaporator coil outlet; this is what manufacturers use for TXV superheat settings. Finally, there is the discharge superheat, taken 6″ from the compressor discharge outlet. This third one will be discussed in a future article.
Why Does Superheat Matter?
Superheat is an important measurement for any metering device. If we don't have enough superheated vapor, we can flood the evaporator coil and end up with liquid in the compressor. If we have too much superheated vapor, we starve the evaporator of liquid needed for cooling and can overheat the compressor.
Here, we will primarily talk about the indoor coil in cooling mode. We have a very basic representation of an indoor coil in the illustration below. I have cut away sections of the copper piping to get a sense of the refrigerant's progression as it travels along the piping, absorbing heat and changing from a saturated state to vapor. You will also notice in the image that this indoor coil has a TXV attached to it.
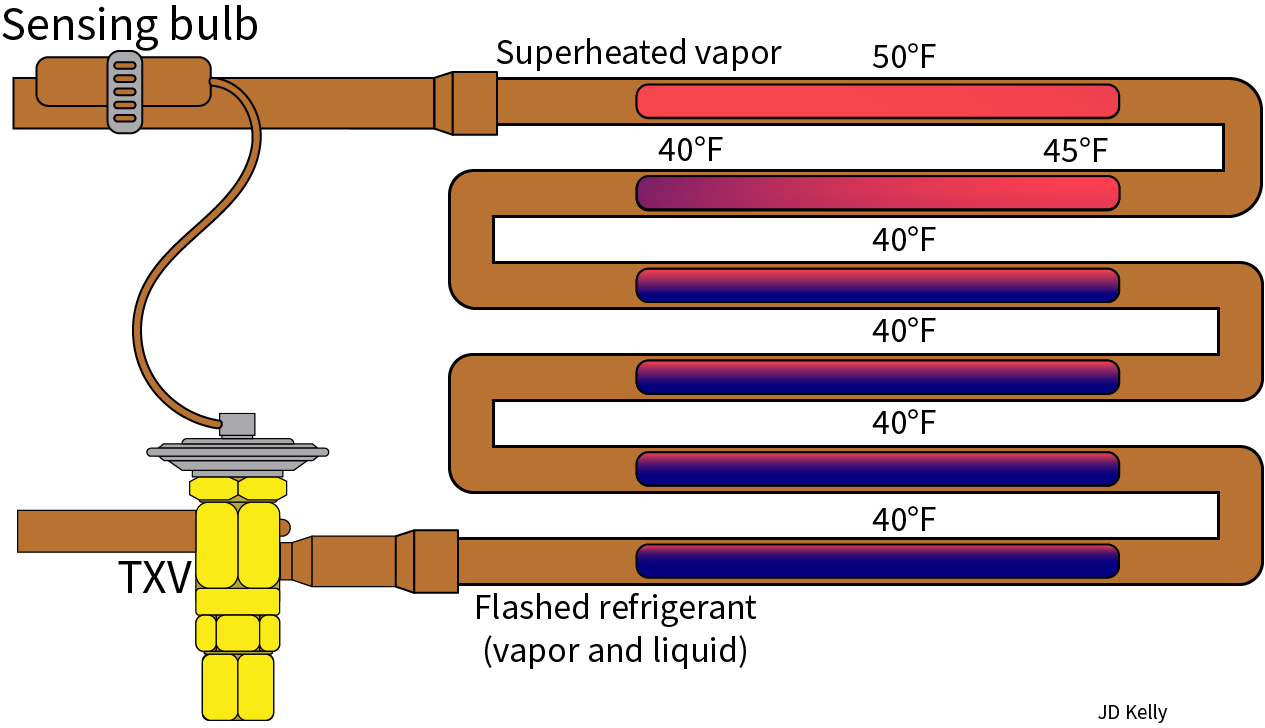
The TXV is a mechanical metering device that requires a full column of liquid refrigerant to be fed to it. This full column of liquid is pushed through the TXV’s modulating valve, where it experiences a sudden pressure drop as it is sprayed into the expansion line. (Note: this simple illustration does not show distributor tubes for reasons of simplicity.) During this sudden pressure drop, the refrigerant flashes into a percentage of vapor and liquid. For the purpose of this article, we will say 75% liquid and 25% vapor, but it’s important to note that these numbers are highly variable from system to system.
At this point, the refrigerant is considered saturated. As stated earlier, saturation is a state where both liquid and vapor exist at the same time and place.
As the refrigerant continues its journey through the indoor coil, it begins to boil and absorb heat from the inside air as it passes over the coil. Most of the heat is absorbed when the refrigerant changes state, but we can’t measure the quantity because the temperature stays the same. The illustration should not be thought of as an exact replication of the refrigeration changing state, but it shows the incremental change from liquid to vapor as the refrigerant boils.
The desired outcome in an efficient system is to have the refrigerant in its fully vapor state before it leaves the evaporator coil. Once the refrigerant has fully transitioned into vapor, it will continue to absorb heat. This temperature increase is considered superheat. Theoretically, the lower the superheat, the more efficient the system would be. However, there are risks associated with very low superheat, such as undesirable liquid reaching the compressor.
Charging By Superheat
If we have a fixed orifice metering device, the system is typically charged by superheat. With proper airflow, you will compare the actual superheated vapor measurement to a target superheat chart.
Because the orifice is fixed or a fixed hole, the amount of superheated vapor will vary greatly with the conditions. In some conditions, it could be below 5, and it could be as high as 40 in others. You will need the return air wet bulb and the outdoor dry bulb temperatures with the chart or the app for this.
When to Check Superheat
While we don’t set refrigerant charge by superheat in systems with self-adjusting metering devices such as TXVs and EEVs, we should still measure superheated vapor each time. With proper airflow, a TXV will open and close to maintain a constant superheat, so it's often called a constant superheat valve.
As long as we have enough subcooled liquid and proper airflow across the evaporator coil, we can use superheat to determine if our TXV is feeding properly. For example, if our TXV system has a notably high superheat, we could assume that the TXV is not allowing the proper amount of liquid refrigerant to enter the evaporator coil. Underfeeding the coil would cause the limited amount of liquid refrigerant to boil/evaporate into a fully vapor state too early, thus allowing the vapor to rise above desired levels.
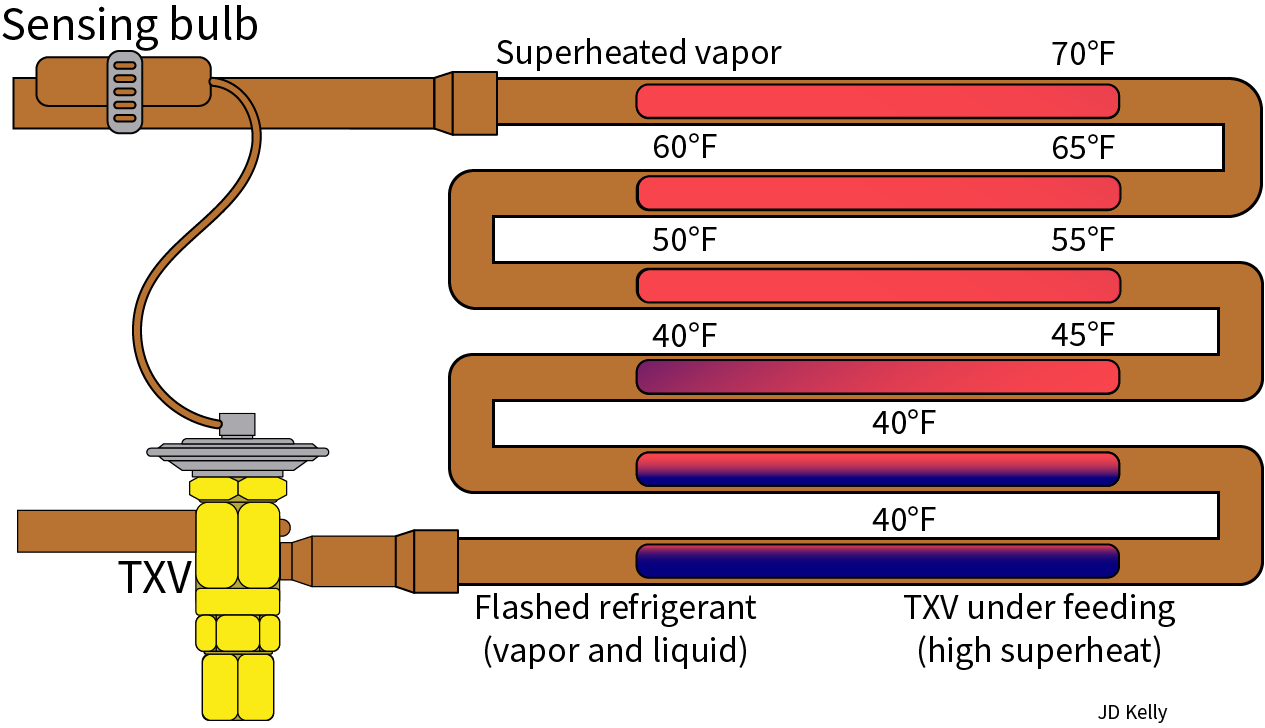
The opposite is true for a TXV that is over-feeding. It will provide too much liquid refrigerant to the coil, essentially flooding it. Neither of these conditions is desirable and will not only rob the system of efficiency but could possibly damage the equipment.
On some models, the TXV can be adjusted to get the desired superheat vapor. Many times, the TXV is misdiagnosed because there was not enough liquid at the TXV due to dirty screens or restrictions.
Electronic expansion valves (EEVs) should also maintain superheat for us if we make sure it has enough subcooled liquid and proper airflow across the evaporator coil. An EEV uses an electronic control board and sensors to measure superheat and a stepper motor to open and close the orifice as needed to maintain a constant superheat. We still need to measure the superheat to ensure the EEV is doing its job. These EEVs can also be misdiagnosed due to poor airflow or insufficient liquid at the valve.
Using the Diagnostic Solve Sheet
Superheat is a measurement that I think we have slowly drifted away from because it has seemingly lost some of its value. Piston-style metering devices are less common nowadays, so we don't set the charge by superheat as often anymore. And while most modern HVAC systems utilize TXVs or EEVs to maintain a manufacturer's superheat I still think the case could be made that it is a valuable measurement when looking at the overall health of the system. So, let's take a look at solving superheat.
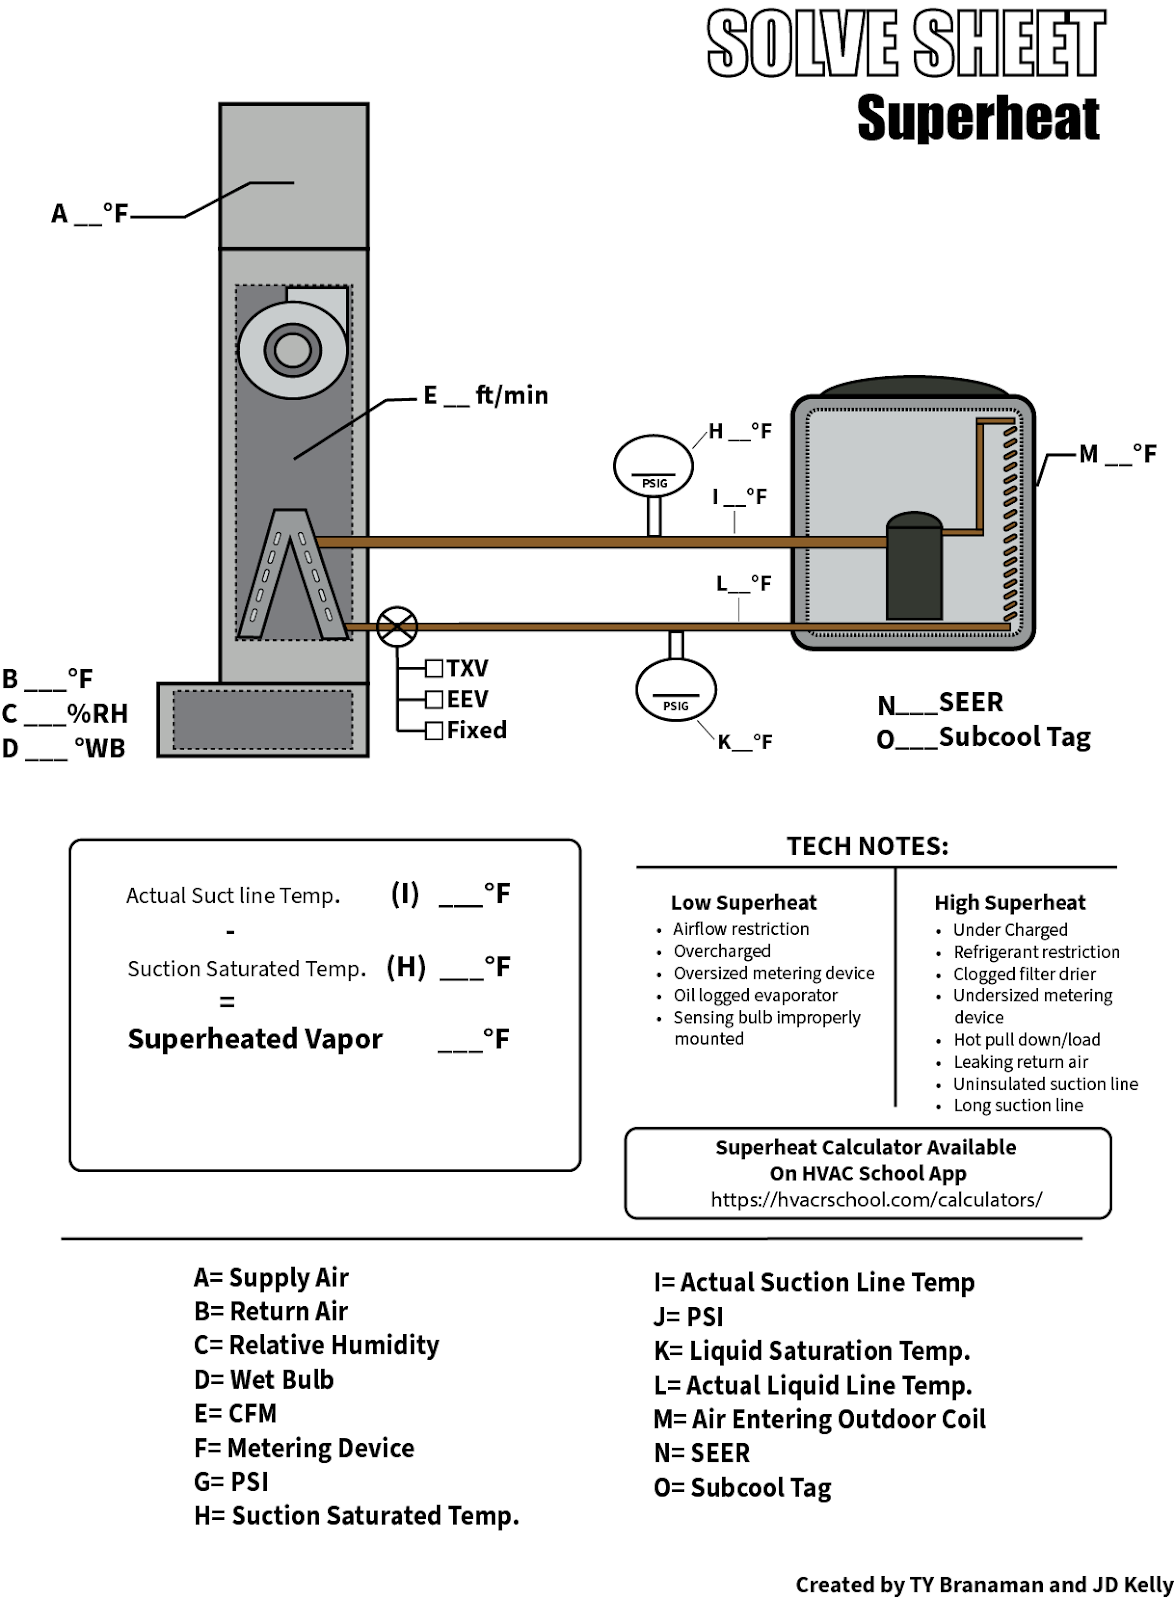
Suction Line Temperature
The first measurement to take is the actual suction line temperature. There are no tricks here; we are simply measuring the suction line's temperature. By attaching a reliable temperature measuring tool, such as a temperature clamp, we can determine the temperature of the refrigerant at that point in the suction or low-side line.
It’s important to remember that there may be instances where line set length and location may be a factor to consider. For example, a line set that travels a long distance through a very hot attic may cause the refrigerant to absorb extra heat beyond that of the evaporator coil; this could result in bad readings and appear as if the system's superheat is too high.
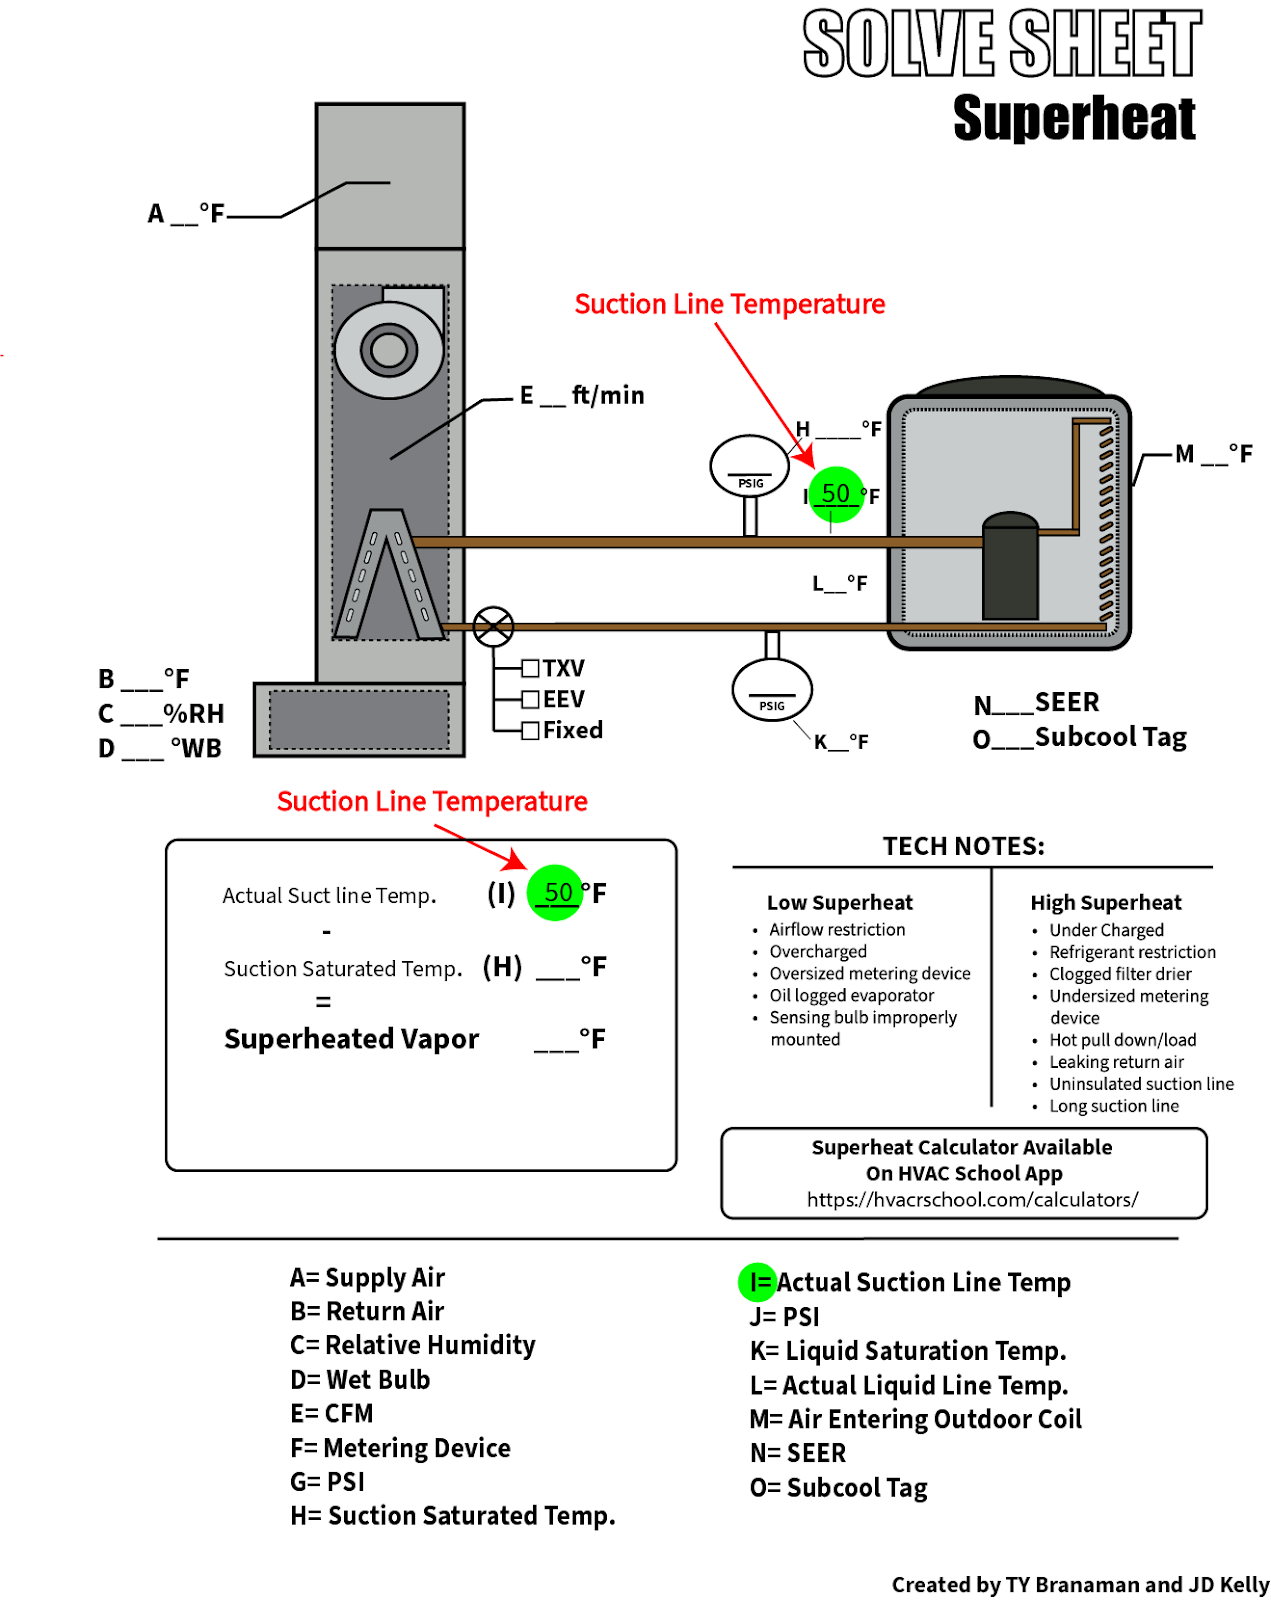
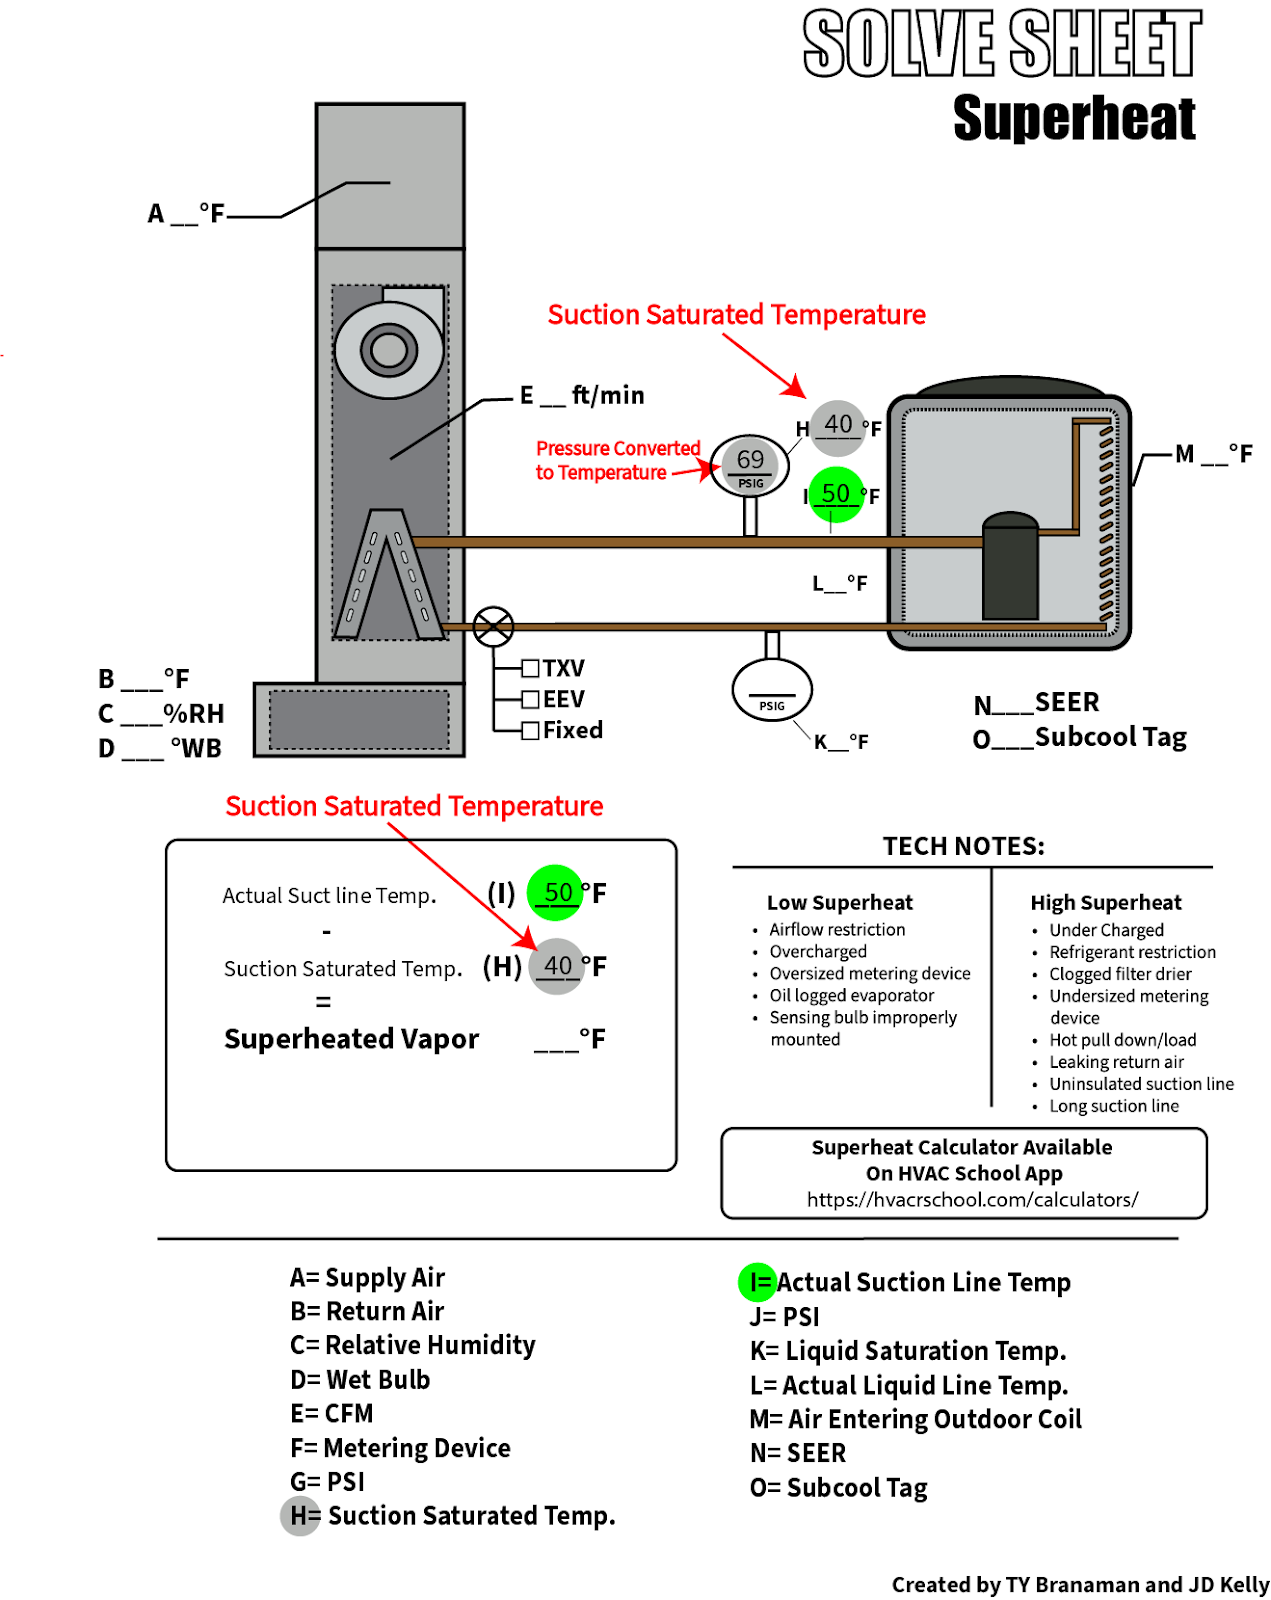
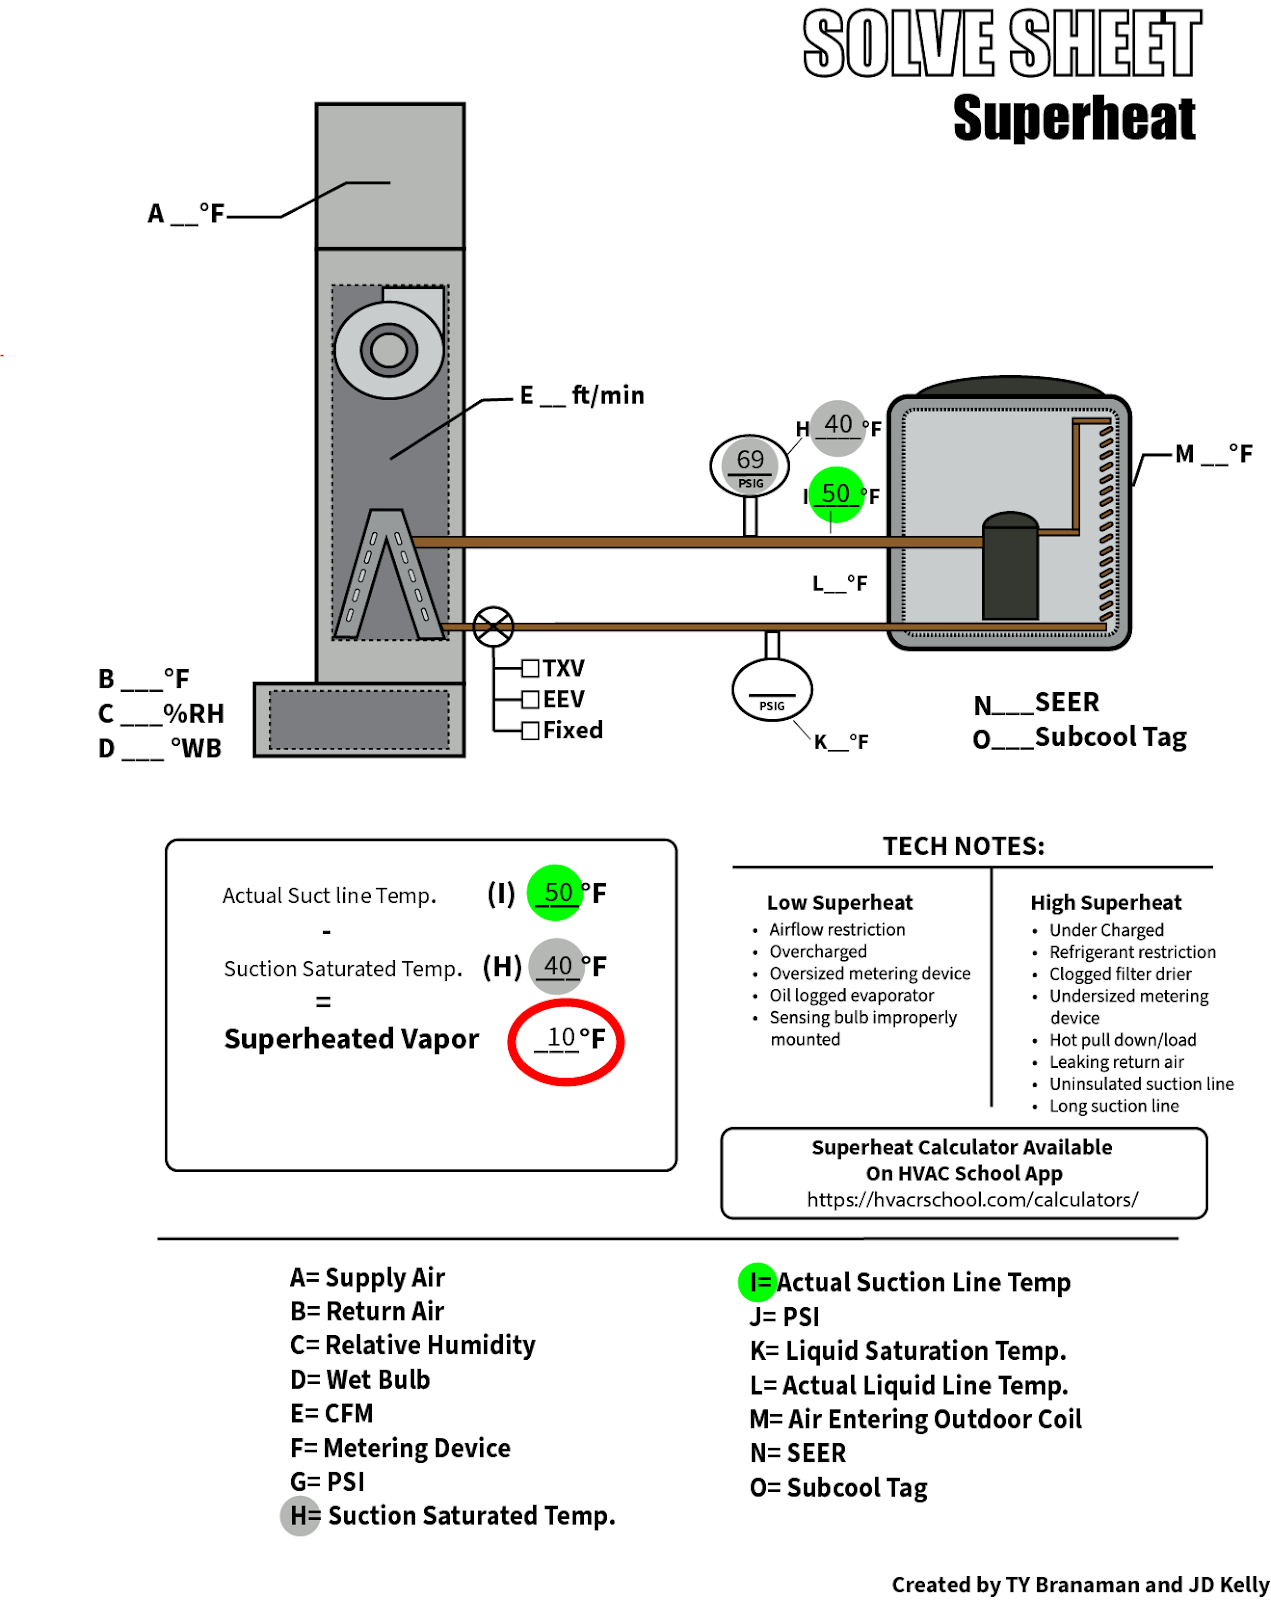
Determine Suction Saturated Temperature
The next measurement is the suction saturated temperature, which is the temperature of the refrigerant in its saturated state. Saturated means that both liquid and vapor are present at the same time and place. This saturated refrigerant is often referred to as boiling refrigerant. In this example, it is essentially the temperature of the refrigerant in roughly ⅞ of the indoor coil. One rule of thumb that has helped me is that the suction saturated temperature should be approximately 35°F lower than the inside ambient air temperature.
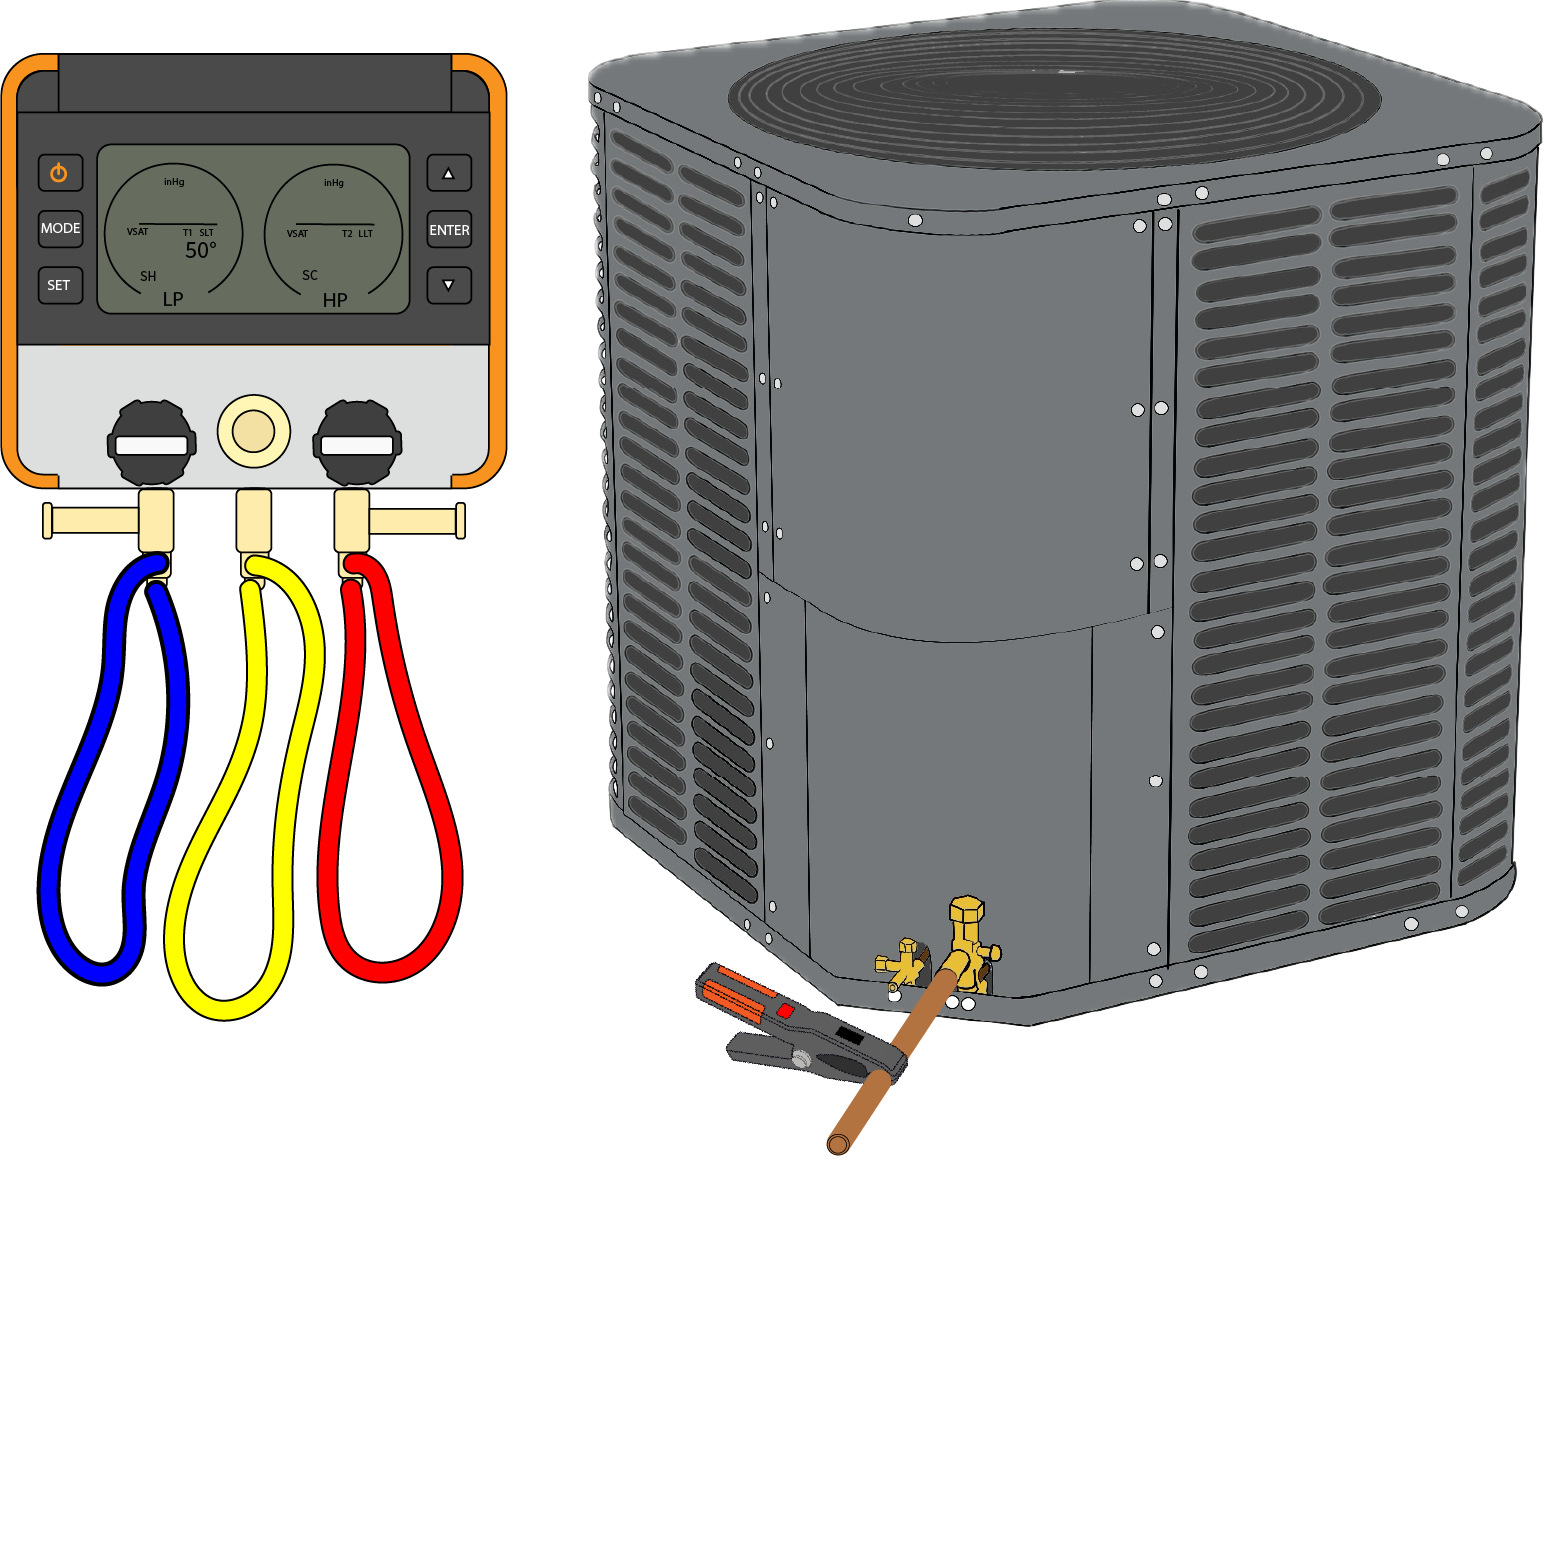
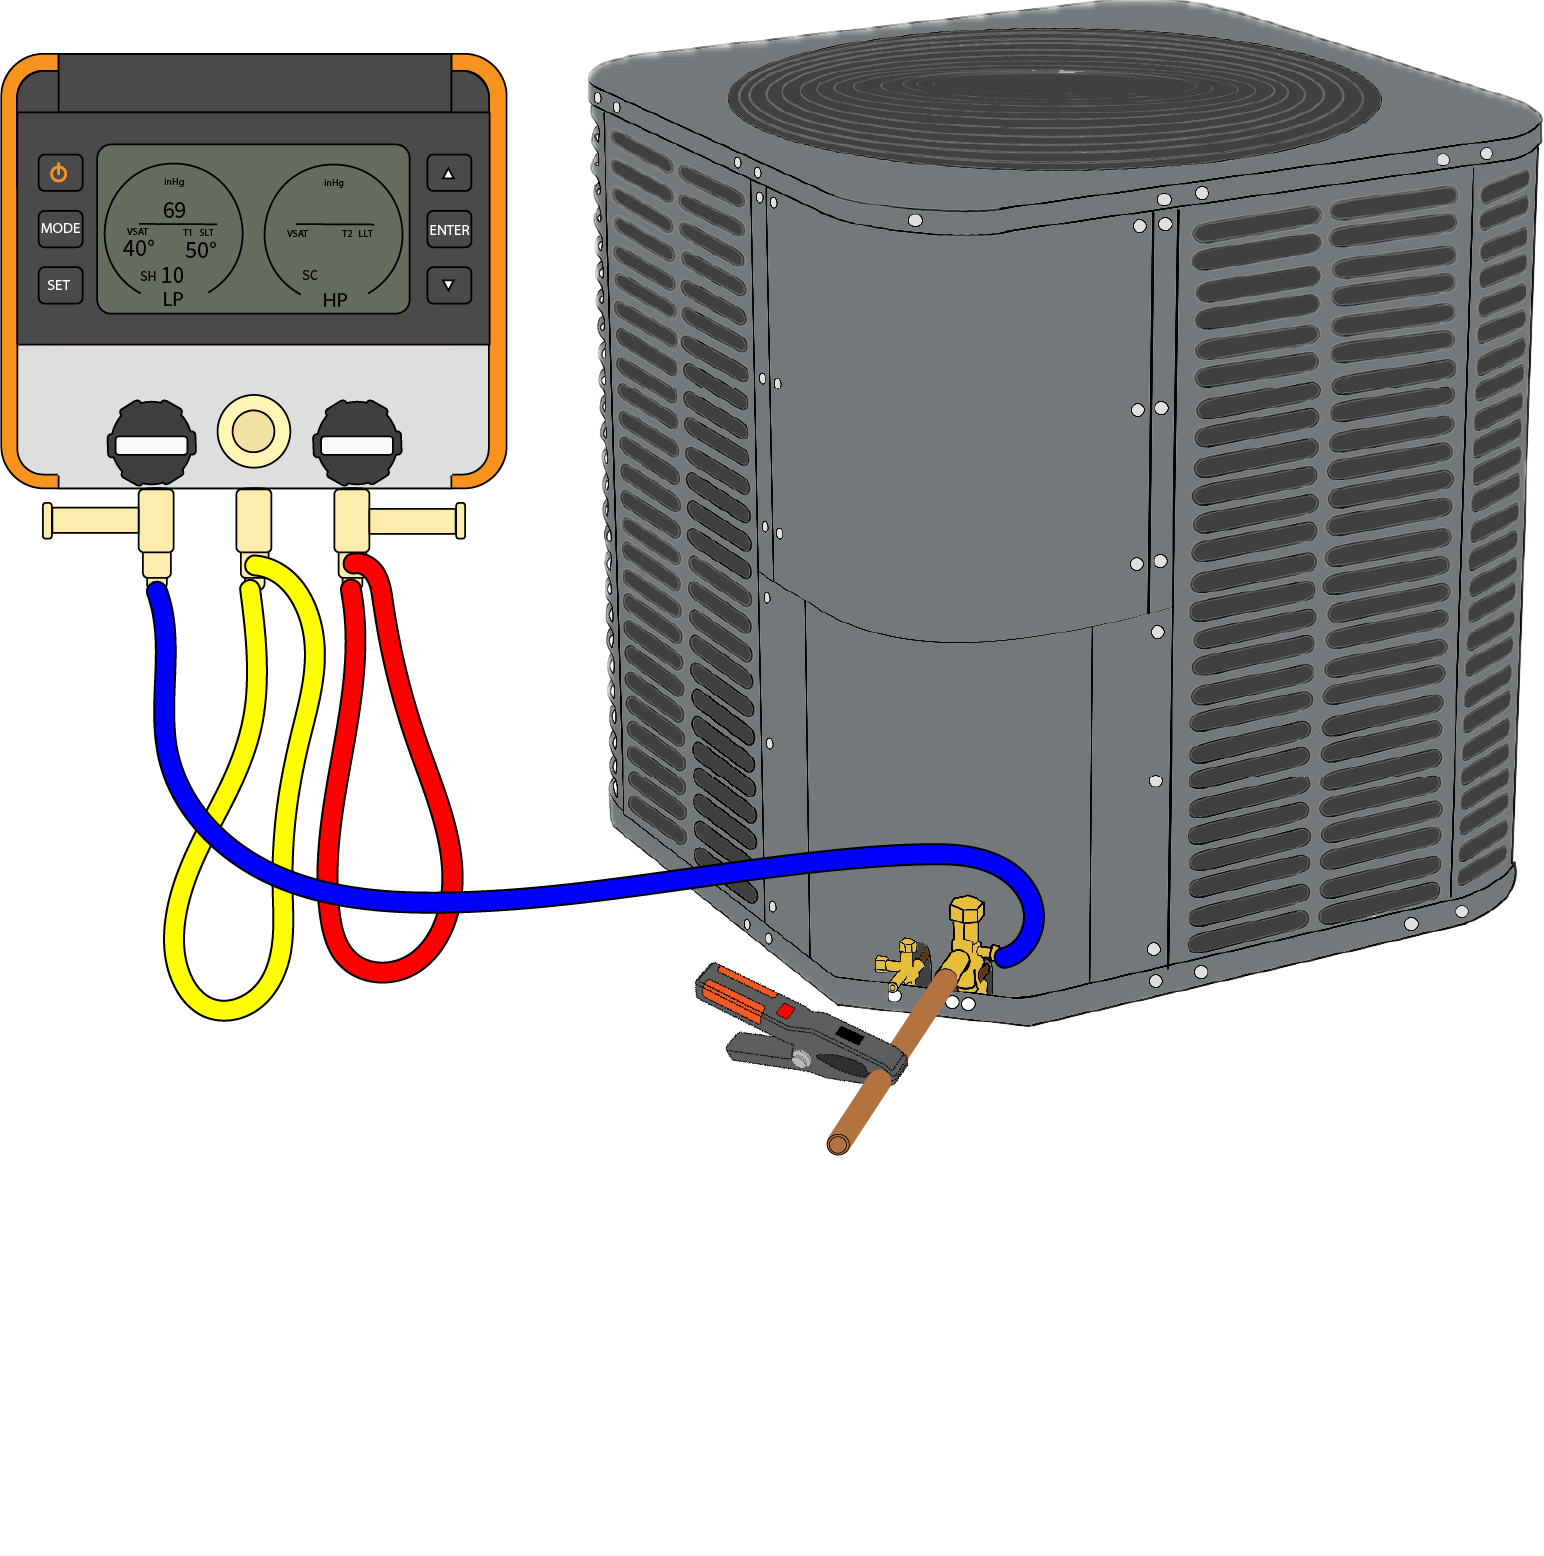
To find the suction saturated temperature, we connect a pressure reading tool, such as a digital manifold gauge or wireless probe, to the suction line service port. Note: this is for cooling mode.
After taking the measurements, we enter them into the sheet:
Some very simple math shows that we have 10 degrees of superheat.
Conclusion
Even though we now have digital probes and apps that will give us these figures instantly, I have found that being able to work these problems out on paper gives me a more holistic understanding of what is going on in an HVAC system. Instead of superheat and subcooling being just numbers on a screen, they are now data that we can interpret. For example, low superheat may be the result of an airflow restriction or the system being overcharged while high superheat may be due to a clogged filter drier or the system being undercharged.
—JD Kelly
 Related Tech Tips


Comments
To leave a comment, you need to log in.
Log In