
Get Tech Tips
Subscribe to get free tech tips.
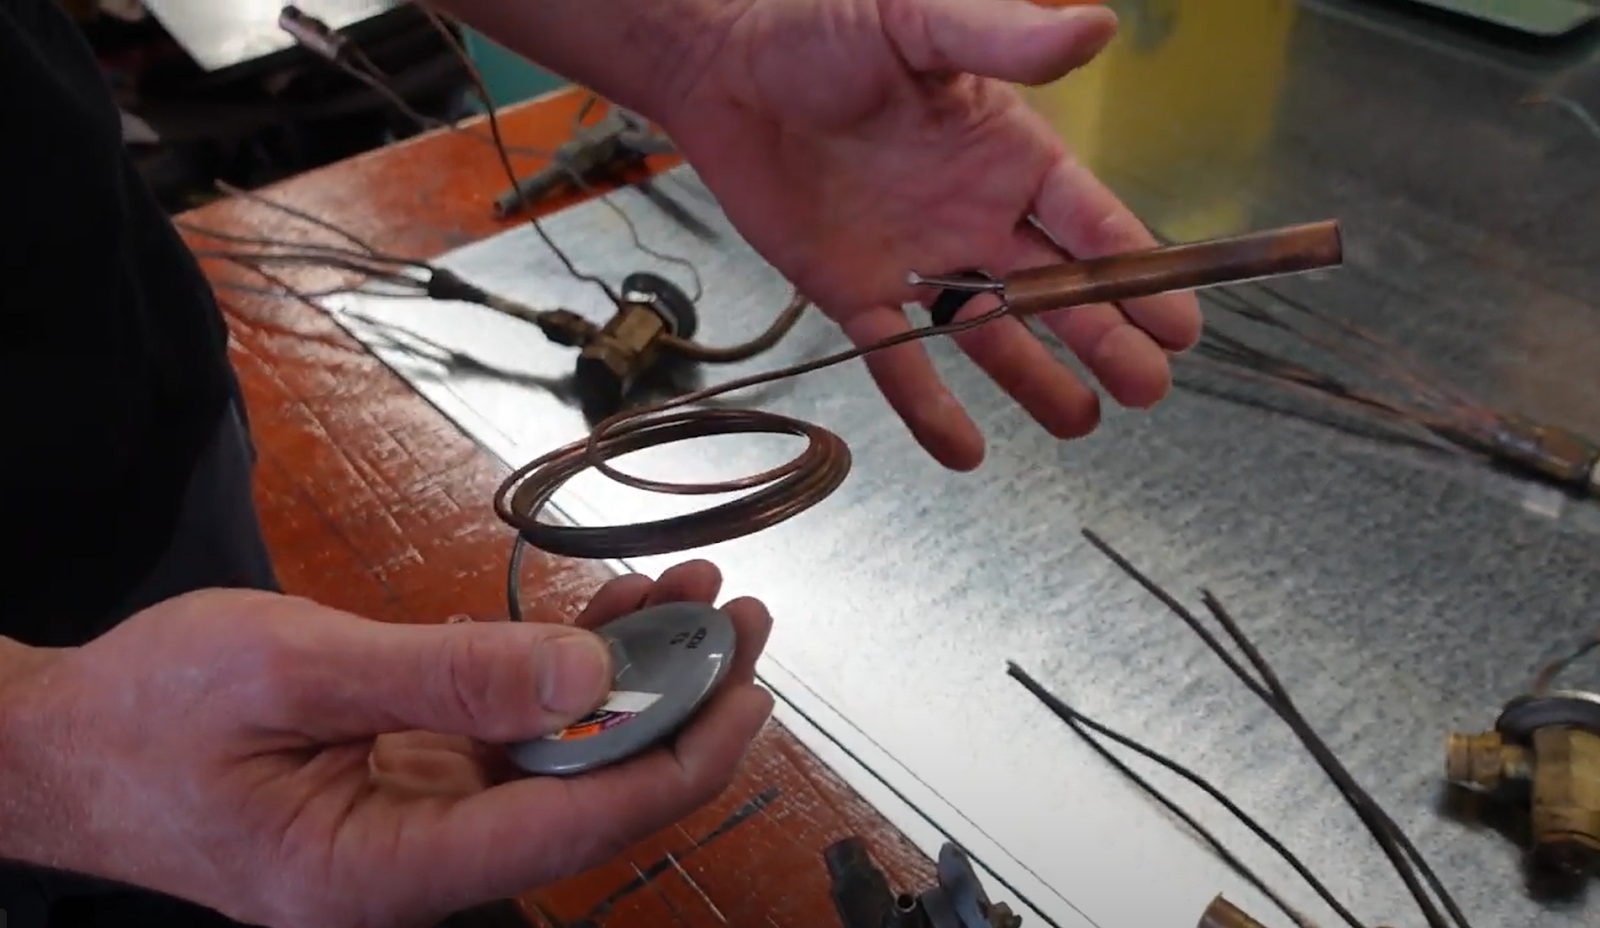
Mounting the TXV Bulb

This is a quick tip from the “Expansion Valves – What Does and Doesn't Matter?” livestream on our YouTube channel featuring Joe Shearer, Matthew Taylor, and Corey Cruz.
Thermostatic expansion valves (also known as TXVs or TEVs) don’t have little brains that tell them when to open or close to maintain a specific superheat. They have a bulb with a little bit of refrigerant inside that follows the same pressure-temperature rules that allow all HVAC/R systems to move heat.
For that reason, it’s critical to mount the bulb so that it has good contact with the suction line and can pick up the temperature accurately. We’ll cover some tips for mounting the bulb for best results, but we first need to look at how a TXV works.
How a TXV Works
A TXV is a mechanical device that’s charged with a little bit of refrigerant in the top, or the powerhead. This refrigerant is NOT shared with the system. It’s inside the TXV and responds to changes in suction line temperature; more heat will cause the refrigerant to expand, which increases the pressure.
The bulb is one source of pressure that opens the TXV. Refrigerant in the bulb responds to the temperature of the suction line. According to Charles’s law, an increase in temperature will cause an increase in volume and pressure. When the refrigerant expands and increases pressure, it pushes down on the diaphragm on top of the valve to provide an opening force. When the pressure decreases, it pushes down more lightly on the diaphragm and applies less opening force.
There are two other sources of pressure that oppose the opening bulb pressure and close the TXV: the spring and the equalizing pressure.
The equalizing pressure accounts for the pressure drop—resistance to refrigerant flow—through the evaporator. The evaporator provides the equalizing pressure for the TXV either externally (via an extra TXV fitting connected to the evaporator outlet, as shown below) or internally (through the outlet fitting of the TXV). This pressure pushes up on the diaphragm on top of the TXV; it applies a closing force in direct opposition to the bulb pressure.
The spring pressure may or may not be able to be adjusted manually, but it provides a closing force underneath the orifice.
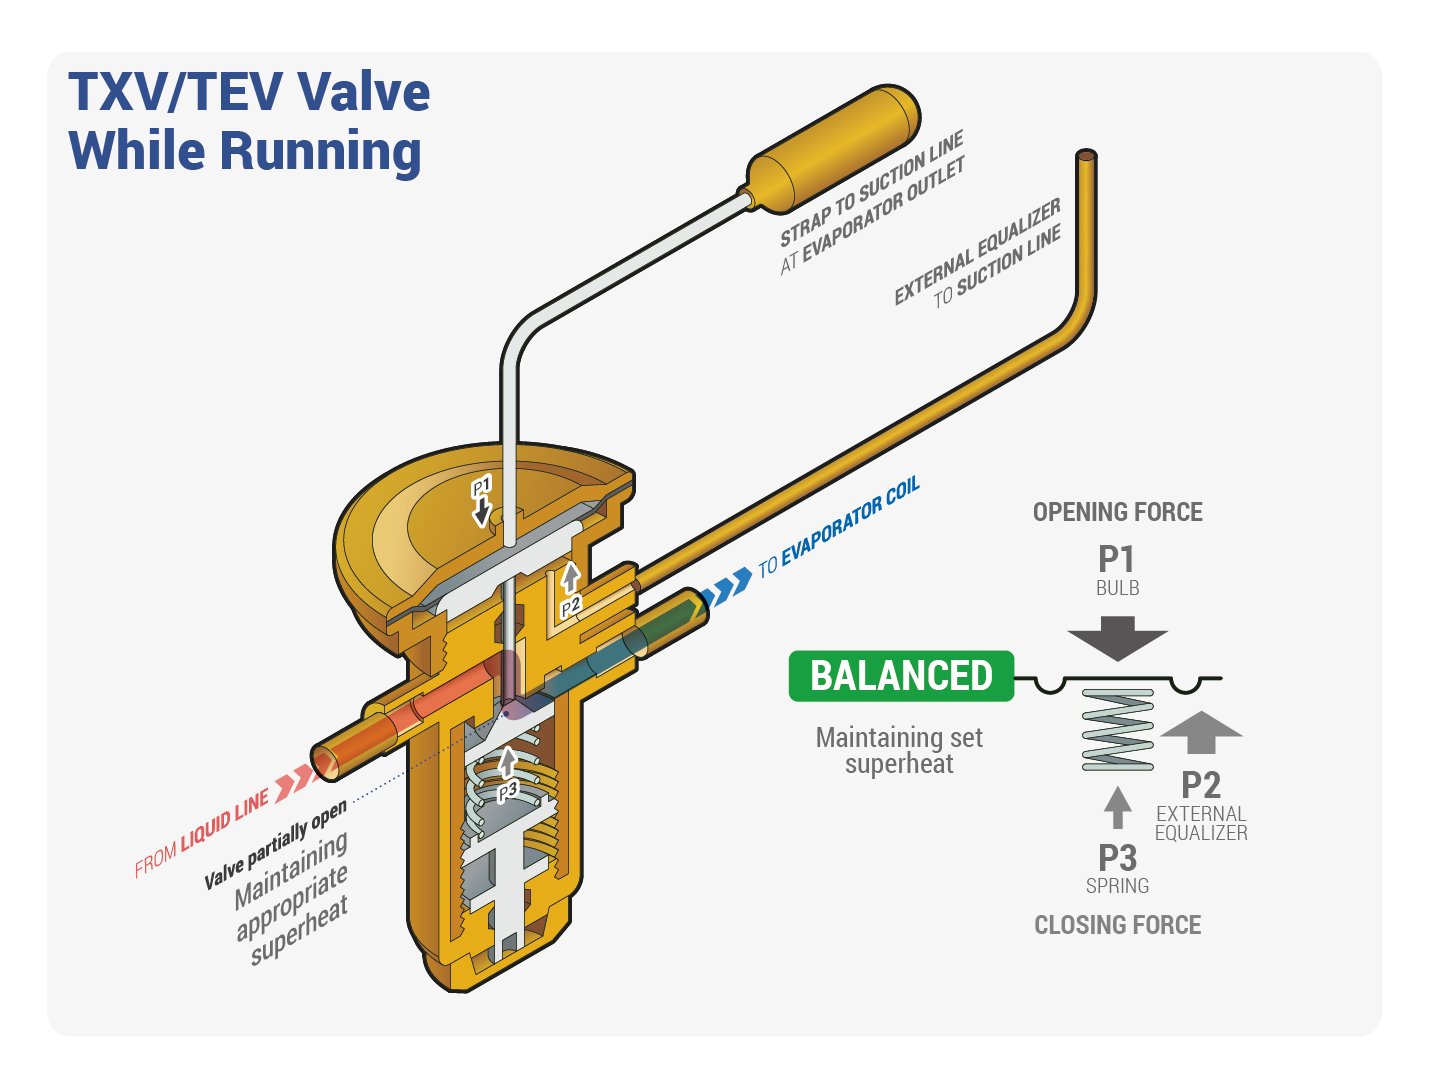
The TXV modulates based on the delicate balancing act between the three sources of pressure. As a result, we need to make sure the bulb is reading superheat accurately at all times to provide that opening force. That’s where proper strapping and insulating come in.
To Clock or Not to Clock
There are a few rules of thumb out there for mounting the TXV sensing bulb in terms of the face of a clock. For example, the diagram below shows that you should mount the bulb at 1 o’clock if the outer diameter of the copper is ⅜”–⅝” or at 3 o’clock if it’s between ¾” and 1 ¼”.
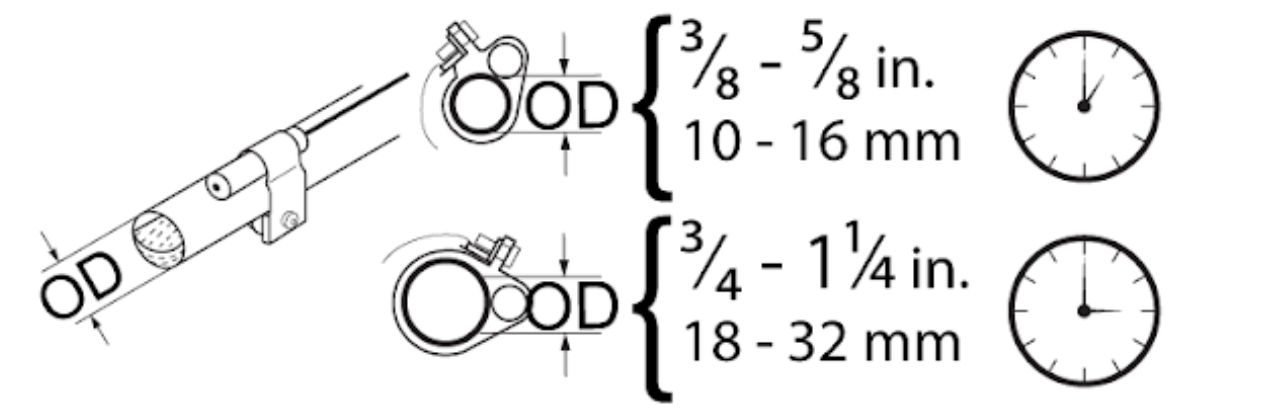
However, having good contact with the suction line is more important than the precise bulb position in most cases.
As long as you’re not mounting the bulb at 6 o’clock, you should be fine. Mounting the bulb at 6 o’clock means that it may pick up the oil temperature rather than the refrigerant temperature. The superheat will be inaccurate because the oil temperature will be different.
Strapping the Bulb
Ideally, you’d strap the bulb with the copper strap that came with the unit or valve kit. However, contact is the most important thing, and if you cannot mount the bulb using the manufacturer-provided strap for any reason, you’re fine with a material that will conduct heat similarly.
Contact and conduction are the two most important things to consider when strapping the bulb. Don’t use zip ties or tape, but you can achieve the intended result if you use copper straps, hose clamps, and the like. (Zip ties also wear out over time, and the contact won’t be good enough to pick up superheat accurately anymore.)
Make sure to get the bulb onto a straight piece of copper, not on a joint. If you’re using a copper strap, make sure it’s tight enough that you can just get the thread in. If you do use a hose clamp, just be careful not to overtighten it.
On Vertical Tubing
If you have to strap the bulb to a piece of vertical tubing, the capillary tube attaching the bulb to the powerhead should be pointing up. TXV powerheads are charged with refrigerant, and some of it will always be at saturation.
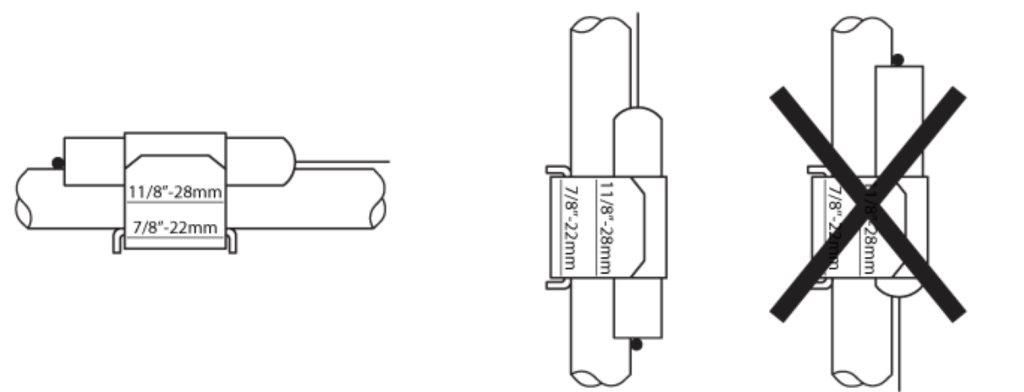
If the cap tube is pointing down in a powerhead primarily charged with liquid, most of the liquid will not be in the bulb. That means the refrigerant will not have as good a chance to respond to temperature changes on the suction line.
Insulating the Bulb
In HVAC applications, the suction line will likely be in a location where it will be exposed to ambient temperature. The ambient temperature will almost always be WAY higher than the suction line temperature, so we must ensure that the bulb is insulated.
Insulating the bulb reduces exposure to the ambient temperature, which the bulb will sense and factor into its superheat reading. This step is critical in HVAC units but a bit less so in refrigeration applications. In most of those cases, the suction line temperature won’t be too different from the ambient temperature, so insulating it is less of a big deal.
Protecting the Bulb from Heat
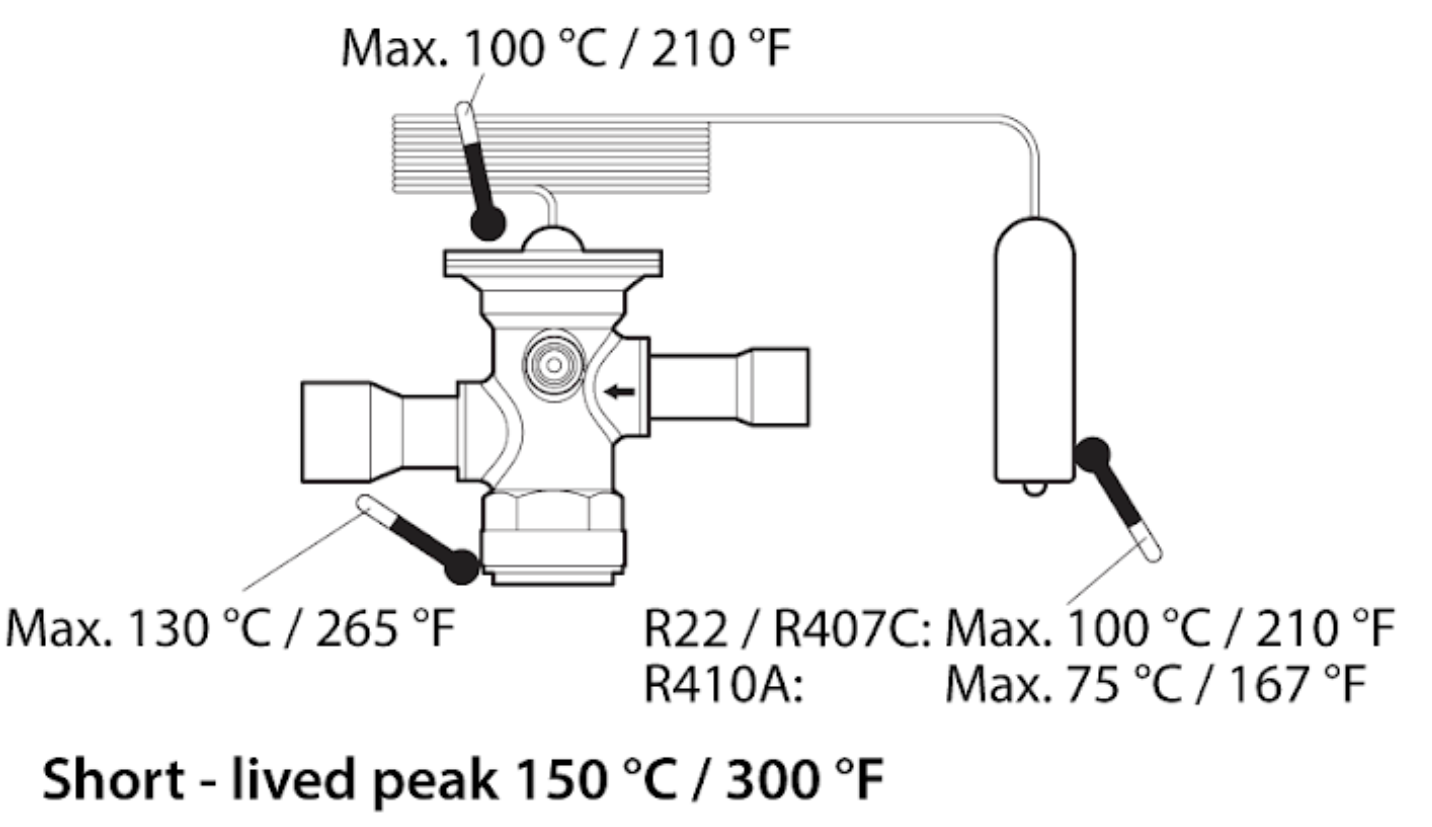
The TXV bulb is sensitive to heat, so you’ll want to be careful if you’re ever going to do any brazing work around it. On R-410A systems especially, the bulb really can’t handle that much heat, maxing out at around 167°F, as shown on the diagram below.
You could always wrap the bulb with a wet towel or cover it with heat-blocking putty, like Refrigeration Technologies WetRag. Otherwise, it’s always acceptable to remove the bulb, especially if you’re still developing your brazing skills or using a rosebud tip or an air-acetylene torch that applies heat to a larger area.
Conclusion
The best thing to remember about mounting TXV bulbs is that you want to set it up to pick up the superheat as accurately as possible. Without that contact, the refrigerant in the bulb can’t pick up the temperature of the refrigerant in the suction line and adjust the opening force of the TXV.
That principle will apply to everything you do to strap and insulate the TXV. Make sure you have good contact with the suction line, mount it tightly, and insulate it from ambient conditions or high heat to give it the best shot at maintaining superheat accurately.
 Related Tech Tips


Comments
To leave a comment, you need to log in.
Log In