
Get Tech Tips
Subscribe to get free tech tips.
Making Duct Systems Work

This tech tip recaps the livestream by the same name, featuring HVAC School contributors Matt Bruner and Adam Mufich, as well as special guests Ed Janowiak and David Richardson. You can watch that live stream on our YouTube channel HERE.
It’s one thing to install a piece of equipment, but it’s another thing entirely to design and install duct systems that deliver air to where it needs to go effectively. When it comes to making ducts work, there are several things to consider all the way from the planning stage through the installation.
It can be overwhelming for HVAC professionals who are just getting started in the world of duct design, but it’s possible to become a pro at doing duct upgrades. The hardest part is getting started and accepting that you’ll make mistakes along the way!
The truth is that any good-faith effort to get better will put you ahead of the curve, and you don’t even have to design systems from scratch right out of the gate. Improving the ductwork at the equipment or focusing on small goals, like improving comfort in a particular room or getting better airflow, are great ways to start.
Getting Started (For Real)
Once we get past the initial obstacle of self-doubt, we can tackle the real first phase of installing thoughtful ductwork: ACCA Manual D.
It seems like a daunting first step, but the good news is that you don’t need to know the manual inside and out. However, you’ll certainly benefit from knowing the principles in it. When you can understand the principles of air movement and how good duct design supports it, then you can make better decisions when you make duct upgrades.
Visual Inspection
When you approach a home that may have a problem with its ductwork, you’ll want to start off by pulling off the panel and doing a visual inspection. Common visual red flags include damage to the blower housing (including soil and stains from condensate).
The filter is also a great place to start; is it appropriate for the system? Is it clear that filter maintenance has (or hasn’t) been done well? Is it caved in? There are other signs that can tell you how well a system is filtering contaminants out of the air. For example, dirt may accumulate in the condensate drain pan if there is too much bypass for effective filtration.
Loud noises are audible red flags that can give you clues before you pull tools out. Ideally, occupants should not hear the equipment. If they're turning up the TV when the HVAC runs, it's a problem.
Airflow
The system may also show other signs of poor airflow. A lot of the time, we’ll see cases where we don’t have enough airflow, but it is entirely possible to have too much airflow. It’s possible that the blower motor drive is causing it to move too much CFM of air. Combine that with insufficient ductwork, and you could get noise issues and quicker temperature drops, both of which cause occupants to feel uncomfortable.
It’s worth noting that those temperature drops are not the same as “blowing air on people.” Blowing air on people is usually a supply outlet placement issue or supply register problem.
Measurements
Once you’ve ruled out any cleanliness issues, including a dirty filter, coil, or blower wheel, you can start taking measurements. The go-to first measurement is usually total external static pressure (TESP). The TESP will let you know how much resistance to airflow is within the air handler. Note that test locations will vary depending on if you’re working on a furnace or fan coil.

Then, we can look at pressure drops over individual components, including the filter and coil. We can also check return and supply pressure to see if we have restrictions that need to be addressed.
Using a Dual-port Manometer
Dual-port manometers measure a pressure differential between two points and are what we typically use to measure TESP. Analog manometers (think old-school Magnehelics) require you to put the low-port probe on the negative side and the high-port probe on the supply side. Digital dual-port manometers, like the Fieldpiece one shown below, can typically read the differential between two points regardless.

However, both types of dual-port manometers tend to be less effective at locating restrictions than single-port manometers. They are best used for reading total external static pressure.
Low Static Pressure Readings
It’s common knowledge in the trade that high static pressure is bad, but that doesn’t necessarily mean that low static pressure is always a good thing.
You can typically be satisfied with low static pressure on a newly installed system. However, a system that has been operating for a long time may have low static pressure if it has a dirty filter, internal coil, secondary heat exchanger, or blower wheel. In that case, the low static pressure would be due to low airflow.
Dehumidification mode and improper pin settings may also create low-airflow conditions that cause low static pressure.
“Maximum Rated Static Pressure”
You may see a tag that says “maximum rated static pressure.” Using this number on your friction rate worksheet isn’t what Manual D recommends. Instead, you’ll need to use the blower tables to determine static pressure across multiple components, which will allow you to come up with a bite-sized “allowance” for each component.
For example, if you have a maximum rated static pressure of 0.5”w.c., then you can allow 20% of that for the return duct, 20% for the supply duct, 20% for the filter, and 40% for the coil.
Adam Mufich also wrote a tech tip about filter and equipment selection, which you can read HERE.
Planning to Improve the Ductwork

Before you make any changes to the ductwork, you must have an interview with the customer. Asking them about their comfort and goals helps you create an opportunity to present your findings to them and tailor a solution to their specific situation. Use this time to think about and communicate repairs that would help the customer meet their goals.
Addressing Inlet and Outlet Pressures
One of the best things you can do is aim to relieve inlet and outlet pressures by ensuring that you have good airflow. Think about replacing existing high-resistance areas with better fittings. In the return duct, you will want a fitting that reduces resistance as the air enters the air handler. In the supply duct, you will want to focus on fittings that reduce turbulence around the bends (within the constraints of the structure, of course).
Some low-hanging fruit solutions include adding returns to give the air more places to go.
Fitting Selection and Replacement
Fittings have equivalent lengths that we’ll need to take into account, but we also need to be mindful of the behavior of air in general.
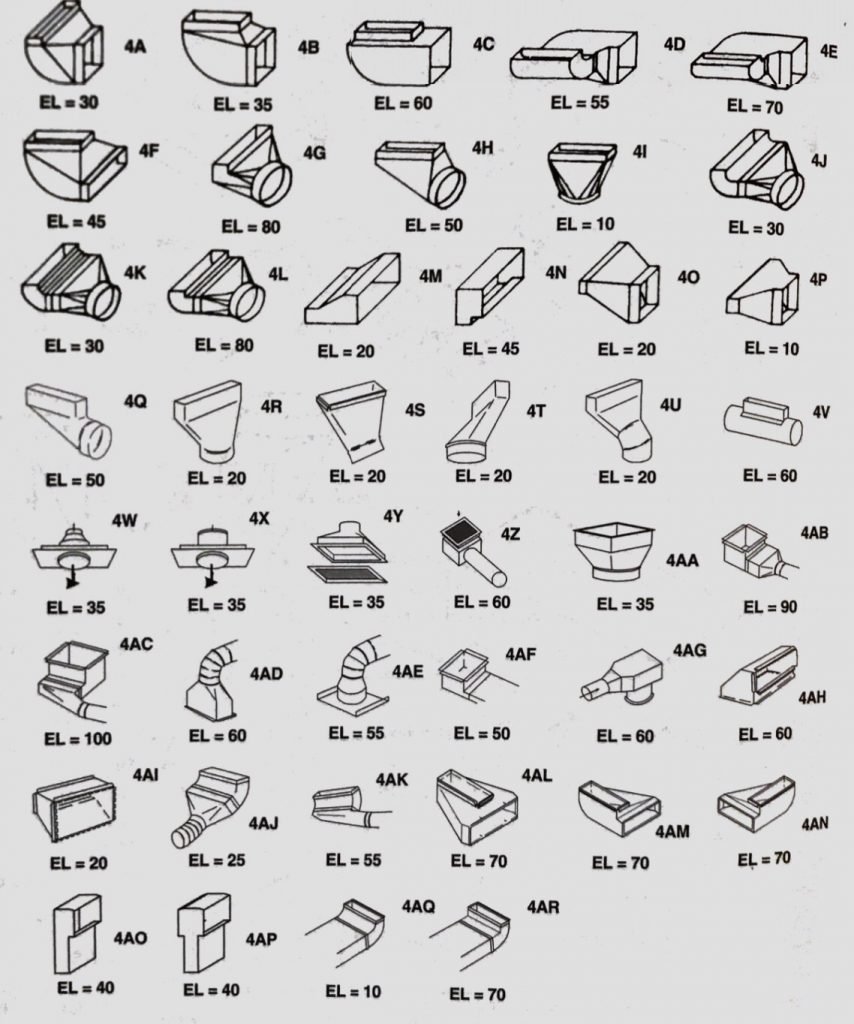
Air moving at high velocity inside a duct can’t make tight turns without gaining turbulence. Air can’t make a 90-degree turn in the same way that a car going 80 mph on an interstate can’t. Long, sweeping bends are best to use whenever possible. Whenever it’s available and feasible, you may consider installing turning vanes.
Keep in mind that craftsmanship plays a huge role in duct improvements; some people opt for sheet metal bends and straight runs of flex, but you’ll only get the most out of flex duct if it’s tight, not compressed, even on straight runs.
Selling Results
The traffic metaphor above is also good for communicating the problems and solutions to your customers. If you can’t sell your solutions, you can’t improve your clients’ comfort at all. You can make a real difference for your customers if you can use metaphors in terms they understand and communicate their pain points in terms of those metaphors.
You can demonstrate flow with something like toilet paper to show the customer how air is currently being moved and how it could be moved with your solution. It’s also worth noting that you’ll have to mind the effects of other appliances (and building conditions, including closed doors) when you demonstrate and implement your solutions, including negative pressure from gas water heaters.
Customer education is another big element of selling results. Something like closing a door can have a major impact on air circulation throughout the home, making it hard for the supply air in one room to end up back at the return grille in another room. These explanations and demonstrations go a long way to help customers understand what they need to do to see the results they want.
Can Ducts Be TOO Big? Velocity Too Low?
In general, you’re likely to see problems with undersized ducts but not oversized ducts. No matter where the ductwork is placed (in an attic, basement, or otherwise), there will be space constraints of some kind, but ducts really can’t be too big for performance reasons. Even so, velocity, not size, is usually the core issue when it comes to ducts that are undersized.
In a branch run, there’s no way for the velocity to be too low. We should be focusing on volume in branch runs instead. Manual D can show you how velocity can widely vary between different duct sizes, even if they’re delivering the same volume of air, but the throw and spread will depend on a properly sized boot and supply grille. The volume will be the same at the boot regardless of velocity, so we don’t have to worry about the latter being “too low.”
A Ductulator can be a valuable tool to help you determine if the sizing upgrades are feasible. However, it’s not something that we should haphazardly use for rule-of-thumb sizing.
Overall, it’s pretty hard to go wrong with large ducts and balancing dampers. That’s a winning combination that gives you a lot of control to make fine adjustments for the customer.
Testing Out
You should test out anything that you test in, including static pressure and any readings you might have gotten with something like a TrueFlow grid. The goal of testing out is to confirm your results and assure the customer that your work has led to better results.

Some common readings to collect and present to the customer include:
- Static pressure
- Fan airflow
- System airflow
- Equipment temperature
- System temperatures
- Refrigerant charge readings
- Combustion readings
With the test-out data in front of you, you can figure out if you’ve met the customer’s goals or if the system can benefit from some adjustments to get closer to the mark.
Testing out with tools like the TrueFlow grid and apps like measureQuick gives your customers an “assurance policy” backed by transparency. You can give your customers results that they can see, which builds trust.
The common ABC acronym we use for commissioning stands for “Airflow Before Charging,” so we’ll want to revisit the charge any time we do a duct upgrade that affects the airflow. You’ll likely need to recover refrigerant, especially if other technicians jumped straight to adding charge without checking the airflow on previous repairs.
Conclusion
When it comes to making duct systems work, the key is to focus on delivering results that you can deliver and prove. That all comes with the territory of listening to the customers, chasing realistic solutions, and managing expectations. Whenever possible, try to go for large ducts with dampers; you will get the most control over your results that way. Undersized ducts are a problem for delivering air; oversized ones are not (so long as they fit in the attic or crawl space).
Duct upgrades can be intimidating; you will make mistakes along the way, and the industry will gradually develop better and better practices. Don’t let those dissuade you from dipping your toes into this side of the industry; document early mistakes or unexpected results and learn from them. If you can, practice doing upgrades on your own equipment.
Overall, it’s most important to remember that understanding and following ACCA Manual D will help you get predictable results. Testing out ensures that those predictions become a reality.
 Related Tech Tips


Comments
To leave a comment, you need to log in.
Log In