
Get Tech Tips
Subscribe to get free tech tips.
Fresh Air in Commercial Buildings: Economizer Sensors and Settings

This tech tip is based on a presentation by Joey Henderson, a veteran symposium speaker and excellent HVAC educator. You can learn more about Joey and the work he does at joejoehvac.com and his YouTube channel HERE.
Simply put, indoor air is often nasty. People cough up and exhale germs, and cracks in the envelope allow dusty air to enter the occupied zone. The HVAC system can rely on filtration to remove some of the bacteria, dust, and other things we don’t want, but that depends on filter type, quality, and fit (i.e., does it allow air to bypass it and keep those contaminants in circulation?).
To make things even worse, commercial facilities have large numbers of strangers in a single place. You know how gross it is when someone coughs without covering their mouth when you’re waiting in line to check out at the grocery store. The HVAC is really just recirculating everyone’s germs with just a filter to stand in the way.
However, we can dilute the pollutants in the air by introducing fresh air. It’s not a good idea to dump completely unconditioned outdoor air into a building, but we can use equipment to help out with indoor air quality and temperature control at the same time.
A Brief Intro to Air Movement
Air, as with anything else in nature, tends towards equilibrium; air with a high temperature will move to an area of low temperature until it’s all one temperature. (Thanks, second law of thermodynamics!) The same is true of pressure and humidity, which also drive air movement—and the movement of all the nasty particles in it.
We can bring in fresh air mechanically to have a bit more control over air movement into and out of a structure. On top of that, fresh air dilutes contaminants like viruses in the air. ASHRAE Standard 62.1 sets forth fresh air requirements for commercial buildings, and the uses of mechanical ventilation—like economizers, HRVs, and ERVs—are explained in detail. However, a general assumption for outdoor air requirements is that there will be one person per 200 square feet.
Economizers
Economizers are common accessories of package rooftop units (RTUs). Their main purpose is to minimize energy consumption, which is part of where their “free cooling” nickname comes from.
Technically, “free cooling” is a bit of a misnomer; the name implies that there is no energy consumption, but economizers still consume power because they need electrically powered fan motors and controls to work. Rather, instead of relying on compression refrigeration to change the temperature, a motor draws outdoor air (filtered, of course) into the unit through dampers to mix with the indoor air.
However, economizers aren’t just good for “free cooling.” They have two layers of filtration (the air filter outdoors and the HVAC filter within the RTU) to bring in fresh air and meet ventilation requirements.
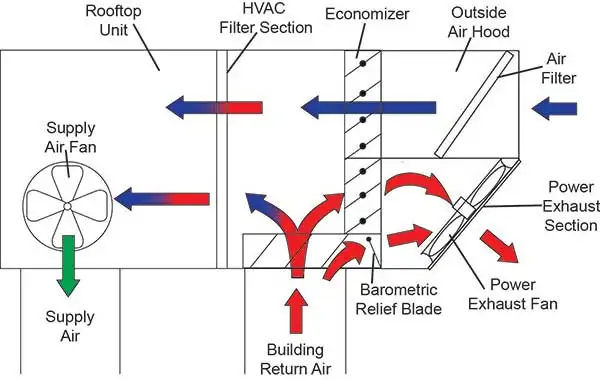
If you want to decode the diagram above, THIS tech tip by Gary McCreadie explains the basic components and sequence of operations. We’re going to focus more on how temperature and enthalpy sensors tell the economizer what to do to bring in the right amount of fresh air.
Temperature & Enthalpy Sensors
Outdoor air sensors may be temperature sensors or enthalpy sensors. Temperature sensors only pick up sensible heat (dry-bulb temperature), and enthalpy sensors pick up the total heat content—sensible and latent heat (wet-bulb temperature). We recently published a tech tip describing the differences between dry-bulb and wet-bulb temperature.
A dry-bulb temperature sensor might only run the economizer if the temperature outside is more favorable than the inside. However, an enthalpy sensor might still run an economizer if the humidity conditions are more favorable, even if the temperature by itself is not.
In many cases, economizers come with temperature sensors, and enthalpy sensors may need to be field-installed as replacements for temperature sensors. However, some controls, like the Honeywell Jade, can give you both temperature and enthalpy readings, not just one or the other.
Sensors & Controls
You’ll have several sensors all talking to the controller to run the economizer: outdoor enthalpy sensor, return enthalpy sensor, discharge temperature, and mixed air temperature.
Honeywell controls have settings A, B, C, and D that tell the economizer when to bring in free cooling and when to rely on mechanical cooling instead. In the case of enthalpy sensors, you can graph these settings on a psychrometric chart. Conditions to the left of the setting on the chart will make the RTU let the economizer handle the cooling, and conditions to the right of the setting will allow the RTU to cool the space mechanically.
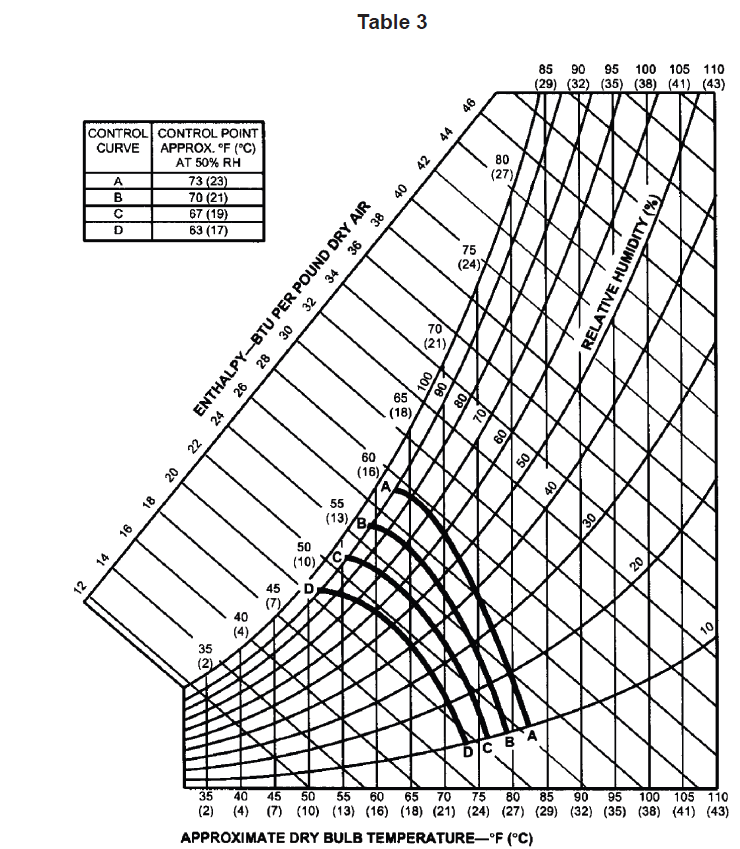
Credit: Joey Henderson
The chart above shows the settings of an analog control. The A, B, C, and D settings are based on the approximate dry-bulb temperature at 50% RH, and that’s why the enthalpy sensing curves cover a range of values. Digital controls are a bit smarter, and these curves may look a bit different (more angular and less curvy).
You’re more likely to see hotter, drier climates use A & B settings, whereas humid climates tend to use the D setting (when they use economizers at all, that is).
Damper Minimum Position
When an economizer is running, the damper minimum position allows the least air to pass without fully closing the damper, ensuring a constant supply of fresh air. The dampers can always open up more to accommodate the need for fresh air or “free cooling.” However, the main purpose of the minimum position is to maintain the setpoint while still providing fresh air.
To determine the appropriate minimum position, you’ll need to do a little math. It’s not too difficult—just some subtraction and division—but you’ll need to plug some readings into an equation to yield the outdoor air percentage, which is what you’ll use to set the minimum position.
Remember those sensors mentioned earlier? You’ll need to refer to them for your math.

If we have an outside air temperature of 40 degrees, a return air temperature of 74 degrees, and a mixed air temperature of 70 degrees, that equation above would look like this:
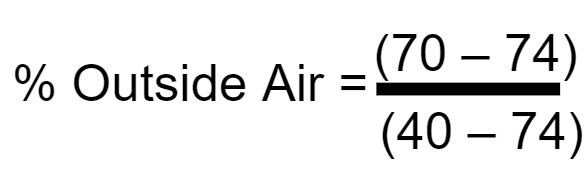
Yes, you’ll get a negative number on the bottom, but it’s really the ratio we’re concerned about, not the positive or negative numbers. You’ll get 4/34, which ends up being just under 12% outside air. That 12% is what you’ll use to set your damper minimum position. You can see a visual representation of this math below; you’re looking for the intersection of two lines, which are dictated by the three readings you received from your sensors.
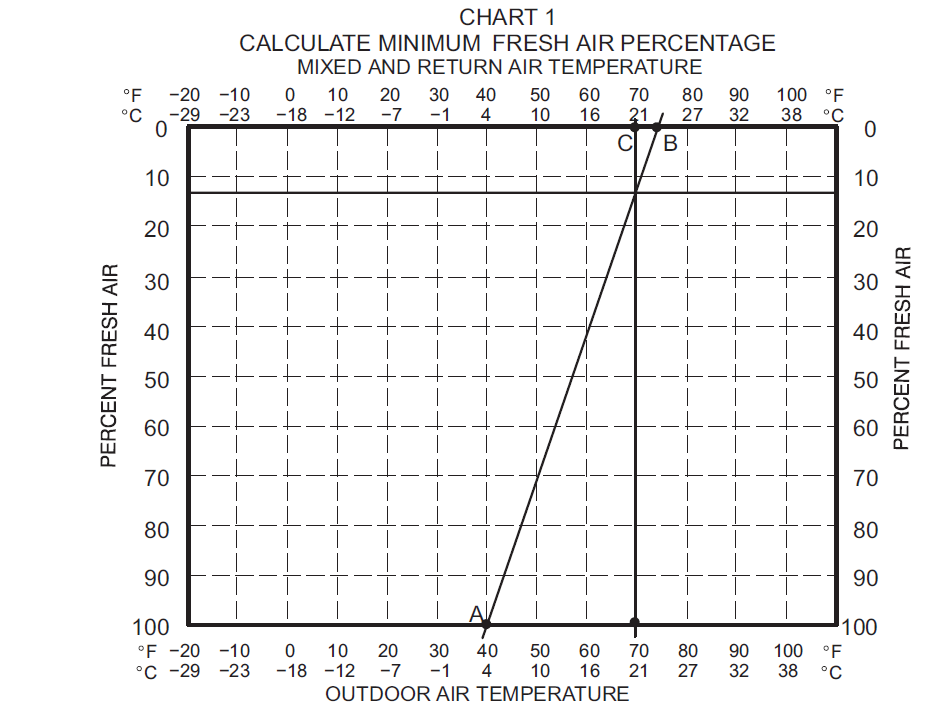
Credit: Joey Henderson
Setting Damper Minimum Position
You can set and adjust the damper minimum position at the controller. You may have analog or electronic controls, which both have different methods.
Analog controls will require a screwdriver to make manual adjustments. Usually near the top of the control, there will be a potentiometer that says “Min Pos” and an arrow indicating which rotational direction opens the dampers. You can use a screwdriver to turn it, which can open or close the minimum position. When testing, you may consider fully opening (100%) and fully closing (0%) the damper position to make sure the whole range is covered. When troubleshooting, this method will also let you know that the issue is NOT with the mechanics of the actual damper.

Credit: Joey Henderson
Electronic controls can be set by scrolling through the buttons on the control and setting the percentage based on the equation above, meaning they’re usually more precise than analog controls. The Honeywell Jade is an electronic control that allows you to set the minimum position on a digital screen at the unit that you can navigate with up & down arrows and enter & escape buttons. The Honeywell Jade allows you to carry out the same 100% & 0% test described above with the “Damper Open” and “Damper Closed” settings in the controller’s “Checkout” menu.
Carrier also has a commercial system controller (SystemVu™) that allows you to set the minimum position at different fan speeds.
With the minimum position set, the controller can then modulate the dampers from the minimum position to maintain mixed air and discharge air setpoints based on outdoor and indoor conditions.
The humble economizer is a lot more than just an energy-saving strategy (even if “free cooling” is a little bit of false advertising). Whether it’s taking orders from an analog controller or a fancy digital one, it’s taking quite a few readings and doing its best in a balancing act between indoor and outdoor as it helps dilute some of the ick in the air. It’s a surprisingly sophisticated system, and proper commissioning is critical for setting up its sensors and getting the right damper minimum position
We’re going to revisit the topic of fresh air in commercial buildings in a future tech tip on ERVs and HRVs, so stay tuned for that!
 Related Tech Tips


Comments
To leave a comment, you need to log in.
Log In