
Get Tech Tips
Subscribe to get free tech tips.
Why and How to Adjust a TXV/TEV


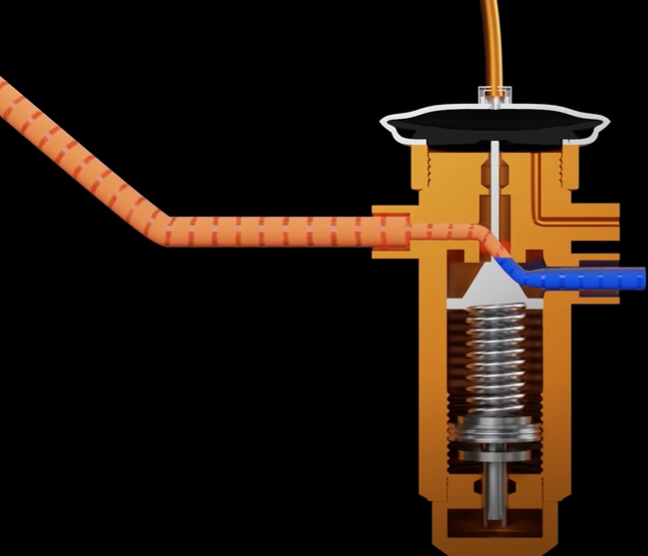
As we discussed in an earlier podcast, a TXV maintains a specified and constant superheat at the evaporator coil outlet. It does this through a balance of forces between the bulb pressure (opening force), equalizer pressure (closing force), and spring pressure (closing force). We can actually adjust the spring pressure on some valves. But why and when would we do that?
Simply put, we do it by turning the adjustment on the bottom of an adjustable valve.
clockwise = higher superheat
counterclockwise = lower superheat
However, before you start messing with the adjustment, I suggest you read on.
First, the valve must be an adjustable type; many valves on small equipment are not adjustable and have no hex cap at the base.
Here are some other items you need to consider first:
Proper Subcool
Before an expansion valve can function properly and do its job, it must have a full line of properly subcooled liquid refrigerant all the way to the inlet. On a split system, checking the subcooling at the condensing unit is a good start. However, you also need to make sure there isn't a significant temperature drop all the way up the expansion valve inlet. Keep in mind that some valves have a screen right at the valve inlet, so a restriction even at that point will cause operational issues.
Required Pressure Drop
For an expansion valve to function, there needs to be a significant pressure differential between the evaporator's design pressure and the liquid pressure entering the expansion valve (in many cases, 100+ PSIG). During cooler times of the year, the outdoor condensing pressure/temperature may drop to the point that the required difference in pressure may not exist. In these cases, the valve may no longer be able to maintain the target superheat. While low ambient controls may be employed to rectify the issue in some cases, in many cases, you must simply be aware that the valve will not function as expected.
Improper Bulb Placement
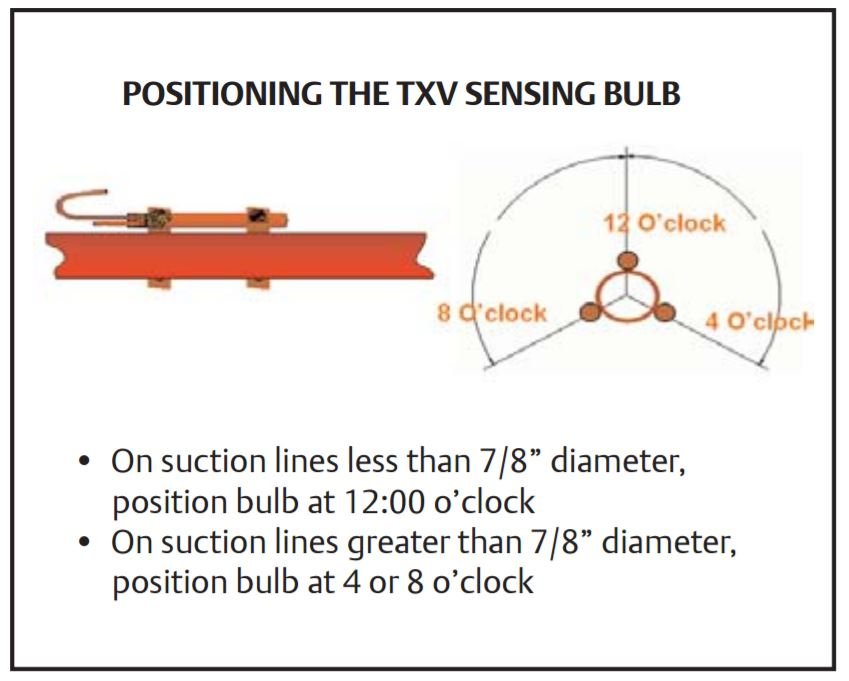
Ensure that the bulb is mounted on the suction line flat and tight with a proper strap. It is never a bad idea to insulate the bulb, and anytime it is exposed to ambient air, it is a necessity.
The graphic above explains what the proper positioning is based on the diameter. It also shows the positioning in relation to the suction line.
When to Consider Adjustment
Now you are at the point where you can consider whether that valve could use some adjustment. First, measure the superheat right at the evaporator outlet in the same general location as the TXV bulb and equalizer. In most cases, the superheat at that point should be 5-10 degrees, but refer to the manufacturer's specs when in doubt. In some cases, you will not have a pressure port at the evaporator, so you must rely on a pressure reading outside.
Use common sense when assessing the situation. Realize that there may be some pressure drop on a 100′ line set, and there should be very little in a 10′ line set. Make some allowance according to the situation.
If the system runs VERY low or VERY high suction pressure or superheat readings that are way out of range, it is very unlikely that adjusting the valve will remedy it. Usually, valve adjustments are only for small superheat changes up or down.
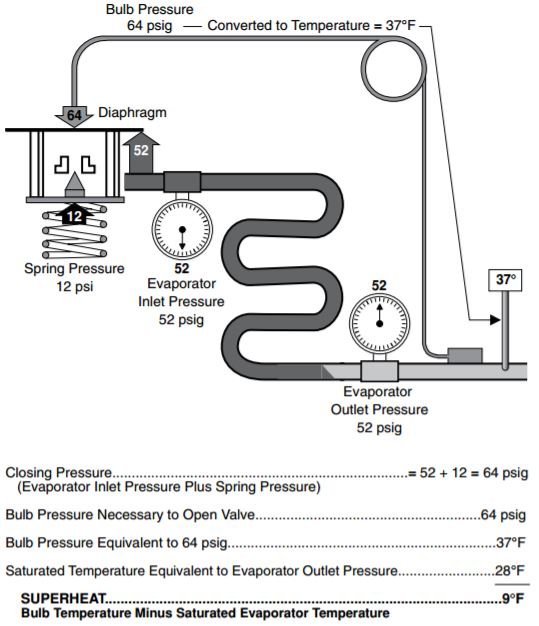
The Forces at Play

The bulb pressure is the opening force of the valve, so when the bulb is warmer, it exerts more opening force resulting in a more “open” orifice. It exerts less opening force when it's cooler, resulting in a more “closed” orifice.
The equalizer is a closing force. So, the higher the suction line pressure, the more the valve is forced closed. The lower the suction line pressure, the more the valve is forced open.
The spring is also a closing force. On an adjustable valve, increasing the spring tension/force results in lower flow and higher superheat, and decreasing the spring tension/force results in more flow and lower superheat. In short, counterclockwise = lower superheat, clockwise = higher superheat.
Making an Adjustment
Before you adjust anything, the system must have been running for a good long while, and you have observed that the superheat has stabilized. You then must check the entire system and surmise that everything else is functional—the valve is being provided with a fully liquid, properly subcooled, high enough pressure feed of refrigerant. If you find it is out of range at that point, then you can make adjustments.
- CAREFULLY remove the hex cap from the base of the valve with a properly sized wrench and a backing wrench exposing the adjustment screw.
- Turn 1/2 turn at a time clockwise (with a refrigeration wrench) to increase superheat or counter-clockwise to decrease superheat.
- After a 1/2 turn adjustment, replace the panels and allow the system to run and stabilize.
- Recheck the superheat and not the change.
- Repeat as needed until you reach the maximum setting. NEVER force the adjustment screw too far; it should require minimal force to turn other than possibly initially to “unstick” the screw.
I actually made a video a while back showing how to adjust a TXV following the steps above. You can watch it HERE.
Adjusting a TXV/TEV is an advanced skill for a technician who has a good grasp of their readings and the forces at play. Tread carefully.
—Bryan
P.S. – Here is a great resource from Parker/Sporlan.
P.P.S. – Clayton Peeples wrote an article about adjusting TXVs in market refrigeration. If you'd like to read about the market refrigeration version of this concept, check out THIS tech tip.
 Related Tech Tips


Comments
Thanks for the article. Very helpful.
Is it true that the same TXV (e.g. an Emerson 0151R00177, 3.5 to 5 tons), when installed on a 3.5 ton system, versus a 5 ton system (everything else being the same), would have the adjustment screw backed out (on the 3.5 ton) from the neutral position (midpoint of screw travel), while the 5 ton system would be screwed in more?
It would be super nice if manufactures would make TXVs that can be adjusted “on the run”, rather than having to pump the system down. without pumping the system down
It would be super nice if manufactures would make TXVs that can be adjusted “on the run”, rather than having to pump the system down. without pumping the system down
To leave a comment, you need to log in.
Log In